January 4th, 2018
Welcome back to the Nerdy Teacher's Corner little scientists!!!

Now that the kids have had time to settle into class, it's time to move forward. So starting today, we are starting our Light and Matter unit. This unit tends to have some difficulty associated with it due to the math calculations we have to do. It's a lot of plugging in of numbers into the calculators, but the kids see numbers in scientific notation (6.636 x 10 ^ -34) and they freak out!
My mentor likes to use a lot of YouTube videos to introduce and reiterate information. For this unit, there's not exception. So, the video we showed the kids is below. One of the things I learned about videos is that you can use them for warmups to get their mind going. You just have to find and create the questions. At the end of this video, I asked students what they thought happened to the test tube. I realize that the video tells you what happened, but my goal is to see what students understood from what they saw. (I would prefer to demonstrate this in class, however, it can prove to be dangerous with the way the cork pops out.)
So, the students are asked to write down what they saw. I'll give them time to write it down and really think about it. Once they've had some time, I will pick on students to discuss what they saw. The conclusion is that light has different amounts of energy. That's what caused the cork to pop. We see that the red light didn't cause the reaction. It must have less energy in comparison to the ultraviolet light.
Now, we can introduce the topic of Light and Matter. Cornell notes are extremely popular at the school I'm currently teaching at. This is something I was extremely unfamiliar with when I first started. However, I really dig these notes. In the case you have never done Cornell notes, I will briefly explain on what they look like.

As a teacher, you can put up a PowerPoint presentation and lecture all you want. However, the kids won't always take notes or know what to take notes on. Cornell Notes help a lot with this. I would put up the PowerPoint presentation and students would copy the underlined information I have chosen. This information is the most important information you want them to get from the notes. Students will need to highlight or underline (matter of preference) key words or information they found important from what they wrote down. The perks of Cornell Notes? If a kid misses class, they can get the notes from any of their friends and will have the same information as anyone else. The negative? Well, they'll miss out on any of the additional tidbits you mentioned during lecture. As you notice, there is a part on the left that gives students the opportunity to add key words or any questions they may have. This allows them to actively learn while they take notes. On the bottom, students are expected to create a summary on what they've learned from the presentation. This is an opportunity to put everything into their own words.
You may say, hey none of my students are going to do this! Well, it's part of their notebook grade. The information will be graded at a later time. At least, this is what I do to make sure they are actively working through this. For the students who do not work on this during their notes, they do end up revisiting the information. That's a perk all on it's own!
Here is the PowerPoint presentation I used. However, this is not mine. Shout out to my mentor Mr. Ismael Renteria for sharing his PowerPoint presentation with me! This link should lead you to my Resources page on my website if you need it. I add on the presentations where I got it from. Gotta give credit where credit is due!
Resources
Resources
Going through this presentation, it is definitely extremely long. I have separated this in two parts while teaching. Today, I cover light behaving as a wave. (The end of that part is slide 23) Next time, we will cover light behaving as a particle. At slide 11, I hand out these diffraction disks so that students can relate to what I'm talking about. I ask them to point them to the light from the classroom and we also take a second to go outside and check it out with natural light from the sun. Always make sure that students DO NOT point this at the sun! We think it's common sense, but I had the question asked. This is just a warning before you begin! A couple of notes on this, as well. I am not sure where to purchase them. The school has provided these, but I'm not 100% sure where to get them. The diffraction disk essentially does the same thing a prism would do. You simply look at the light, slightly turn the diffraction disk and you should see the spectra right in front of you!

I do cover the properties of the waves in this section because it is important for them to know. On a separate page, they will draw a wave, label specific properties, and are given the definitions to different parts. They also receive an electromagnetic spectrum (EMS). Below I have demonstrated. Now, I do cover a variety of things when they cover this. I have them write High Energy on their EMS on the left and on the right low energy. I have them do a wave with their arm. Start with a long wave using your arm and ask "If you did for a while, would your arm get tired?" This is similar to the movement kids do when they put their arm out the car window. The kids can piece together that eventually it will, but the amount of energy you put in is so minimal, it doesn't tire your arm as fast. Now, I have them compare to making short waves and moving faster. Your arm definitely gets tired much faster and the amount of energy increases. This simple idea ties together for kids that energy, wavelength, and frequency are related. If you have a long wavelength, you have low energy waves and low frequency. If you have a shorter wavelength, you can expect to have high energy waves and a higher frequency. I also have them color the EMS so that they can use it as a reference.

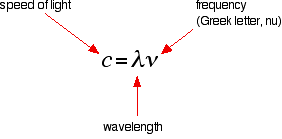
One of the things I try to frequently mention during this presentation is to have the kids pay attention to the color of the waves and the wavelength. You can see the differences in the slides. At slide 23, you notice that I have a practice problem. They will write this in their notebook. This problem focuses simply on the speed of light equation. It is one good example for them to refer to.
(Find the frequency of a light wave with a wavelength of 434 nm)
Students should do the conversion of nanometers to meters, then plug and chug.
However, I do make my students use the four square to solve their problems. It's a nice graphic organizer to get through math problems. That is also show below.
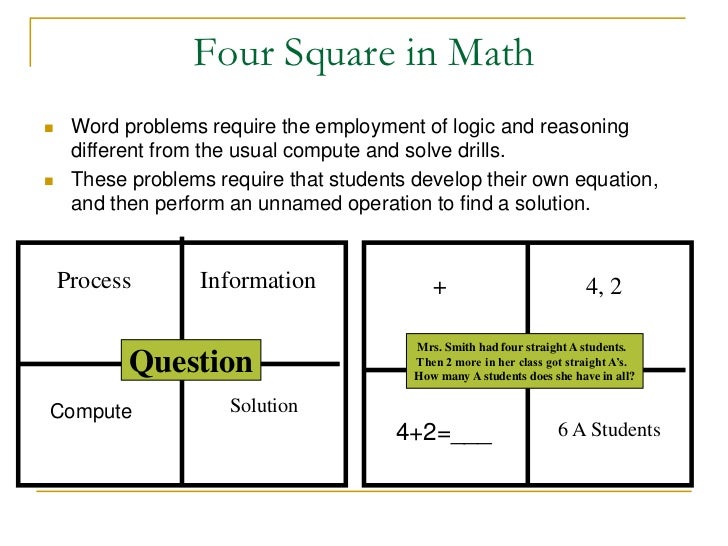
This is what the four square normally looks like. In the first square, I'll have them write what they are solving for. This box should include units and the symbol. The second box, we write what we know. In the third box, we will write the equation we need to use. And in the fourth one they do their work.
Now, the plan was to have them work on the fill in the blank worksheet for the rest of the time. My mentor and I used this worksheet. It's a compilation of a couple different worksheets. We copy pasted what we liked from one and put it in another. Again, here is the link to my resources page on my website.
Resources
Resources
That is all for today little scientists! Tune in next time to the Nerdy Teacher's Corner to see what we have next!
No comments:
Post a Comment