January 9th, 2018
Welcome back to The Nerdy Teacher's Corner lil scientists! I am your awesome teacher, Ms. Llanes. Let's dive right in shall we?
I started the day today with 30 minutes of working on our Wave Calculation worksheet. That can be found in my resources page. My mentor and I added on the four square so that students can actively use it. We are hoping that they will use them to make the math load a little easier. Not only that, but I'm hoping that using a graphic organizer will help them with reading word problems. My link is here below!
The students and I worked on the first half of the worksheet together. We simply worked on rearranging formulas so they are easier to use depending on what they're solving for. We, also practiced putting numbers into scientific notation. After that (which took roughly fifteen minutes with all the questions), I let students use another fifteen minutes to work on the actual word problems. I walked around the classroom and helped them if they asked for it. This only took up the first 30 minutes of class. My last hour of class was reserved for something fun!

Say hello to Niels Bohr! He will be the main topic of our discussion today!
For the last hour, I have dedicated to use a Nearpod lesson for Cornell Notes. I realize that my kids have been taking a lot of notes, but there is a lot of material to cover before we get to the fun stuff! Now, you may be asking, what's a Nearpod lesson?
The Nearpod Lesson is actually a really awesome tool for teachers to use. My mentor currently has a paid subscription. I believe he said it's roughly $10 a month. There is a free subscription, however. It just doesn't have all the nifty features. Here's the website if you're interested.
In the Nearpod lesson, you have the ability to upload your own PowerPoint presentation that students can take Cornell notes for. For the Bohr Nearpod, go to the website and type in Nearpod.com and scroll down to the bottom. You should see a section called For Students and room to type in a code. You can type in YDZNT and see what we specifically did for this lesson. One of the things that makes Nearpod such a success is that it is self-paced. Students decide when they want to move forward. If there's a particular area they are unsure or stuck on, they can ask for help or go back to the part of the lesson that they are stuck on. Another cool feature is that you can add activities for them to complete throughout the lesson to check their understanding. There are fill in the blanks, drawings, warmups, videos, entry/exit slips, and more. You choose what you want to add to it to make it more interactive. Finally, the Nearpod lesson provides data from the student work.
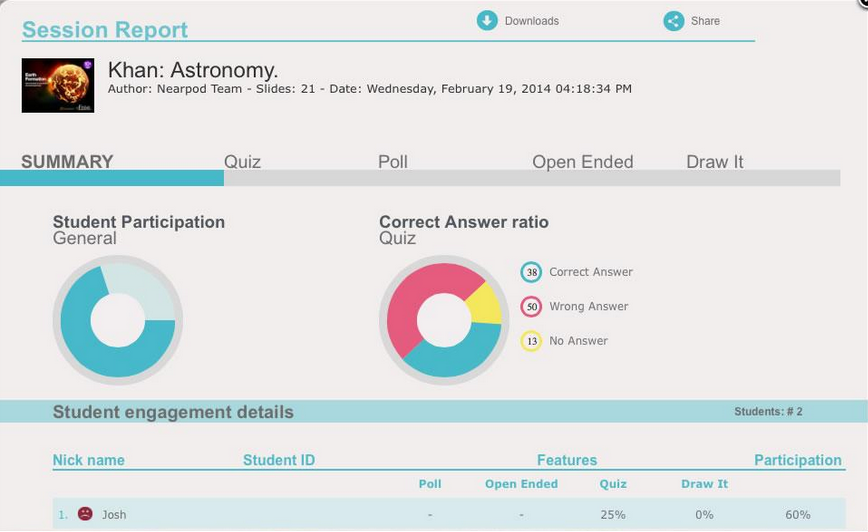
As you can see, the data shows you what each individual (or group of students) answered. You can instantly see what they're struggling with. This allows you the opportunity to reteach anything. I set aside an hour for students to do this so that they have enough time. When I use Nearpod, it makes the lesson and my job really easy. I just walk around the classroom and answer any questions the students have. They still take notes Cornell style. These particular notes should be on page 59 and 60 of their interactive notebook. Page 59 should have instructions on how to draw a Bohr diagram. They also have a reference on how many electrons should be found in each energy level of the Bohr Diagram.

This is all I have for today. Join me at The Nerdy Teacher's Corner next time to see what we have in store!
No comments:
Post a Comment