January 23rd, 2018
Welcome back to the Nerdy Teacher's Corner scientists!
Today is a huge day! Students will be covering The Quantum Mechanical Model which is the most accurate model of the atom to date. It is also the most abstract and difficult for students to understand. To be honest, I'm a little nervous!

First things first. We need the PowerPoint presentation for The Quantum Mechanical Model.
That can be found on my Resources page.
Resources
This presentation is actually pretty lengthy. This was the presentation my mentor used last year. Unfortunately, we will only go up to Slide 45. You will see in farther slides that we would do Periodic Table Battleship. We didn't get to that, sadly. It's sad for me because I really would have liked to see that in action!
To start off the lesson, I have my students draw the Bohr Diagram for Neon-21. This starts off a great discussion with isotopes, which they haven't seen since last semester. Eventually students realize that it doesn't change much in their Bohr diagram except the number of neutrons. We write the neutrons in the middle of the diagram.
 Say hello to Louis de Broglie!
As we begin to discuss this subject, I talk about how de Broglie began to use the theory that light behaves as both a particle and a wave. Could electrons behave as both a wave and a particle? Hmmm. This is where the Quantum Mechanical Model stems from. How do scientists prove that an electron behaves as both a wave and a particle? Uhhh...well there-in lies the hard part. Check out this video! It will explain the struggle with explaining what we're dealing with.
The double slit experiment confirms that the electron behaves as both a wave and a particle. But, every time we try to observe the electron behave a certain way, it behaves differently. I told my students, that the electron behaves a lot like my dog does. I see my dog doing this really cute thing. I run to get my cell phone because it would be awesome if I caught this in a picture or a video. What does my adorable dog do? He does the thing I wasn't expecting him to do. It's not that cute thing I wanted on video. It's him just staring at me. Which is, of course, still adorable, but not what I wanted or expected. It's almost like he knew I was observing his absolute cuteness. *sigh*
That's the electron!

This begins to relate to the Heisenberg Uncertainty Principle. (Yes, this is where Walter White from Breaking Bad got the name from!) The Heisenberg Uncertainty Principle tells us that we can predict the velocity (speed and direction) and position of the electron, but we can never say 100% for sure where it is. The electron is everywhere, but nowhere all at the same time!
 Yup. Same facial expression that my kids give me. How is that possible? Schrodinger's Wave Equation produces the math (evidence) that shows the probability of finding an electron at any given distance from the nucleus. We can say that the electron exists in a cloud. The movement is so fast that it creates this cloud. The way I explained it to my kids is like this.
That can be found on my Resources page.
Resources
This presentation is actually pretty lengthy. This was the presentation my mentor used last year. Unfortunately, we will only go up to Slide 45. You will see in farther slides that we would do Periodic Table Battleship. We didn't get to that, sadly. It's sad for me because I really would have liked to see that in action!
To start off the lesson, I have my students draw the Bohr Diagram for Neon-21. This starts off a great discussion with isotopes, which they haven't seen since last semester. Eventually students realize that it doesn't change much in their Bohr diagram except the number of neutrons. We write the neutrons in the middle of the diagram.

As we begin to discuss this subject, I talk about how de Broglie began to use the theory that light behaves as both a particle and a wave. Could electrons behave as both a wave and a particle? Hmmm. This is where the Quantum Mechanical Model stems from. How do scientists prove that an electron behaves as both a wave and a particle? Uhhh...well there-in lies the hard part. Check out this video! It will explain the struggle with explaining what we're dealing with.
That's the electron!
This begins to relate to the Heisenberg Uncertainty Principle. (Yes, this is where Walter White from Breaking Bad got the name from!) The Heisenberg Uncertainty Principle tells us that we can predict the velocity (speed and direction) and position of the electron, but we can never say 100% for sure where it is. The electron is everywhere, but nowhere all at the same time!

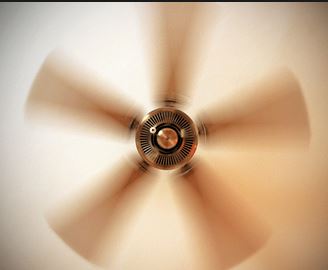
In the summer, we have separate fans because our swamp cooler doesn't cool as well as refrigerated air does. My boyfriend's son loves having these fans around. Mostly, because he likes to play with them. He does that thing that every kid likes to do. He sticks his fingers through the blades while they're spinning. Sometimes he makes it without getting hit. But, about 95% of the time he doesn't make it, the fan makes a weird noise, and he gets yelled at. We can think of the Quantum Mechanical Model like that! If you look at the fan a certain way, you think you know exactly where each blade is at. However, if we think about it, do we know with 100% certainty where the blade is at any given moment? No, but we can definitely predict with a pretty good estimate, right?
Another way we can look at it is like this. I show my students this image.

There's a 90% probability that we can say where the electron is at. I ask my students, "If your parents wanted to know where you were at like 1:25 pm, they would assume you are in class, right? They're probably 90% sure where you are. However, there's the 10% chance that they don't know what period/class you're in or maybe that you happened to ditch (hopefully, you wouldn't be doing that!)." The same goes for the electron. You can predict where it is and you'd be correct 90% of the time. But, there is always that 10% chance you'd be wrong.
Once we go through the background on how this theory came to be, students start filling in the worksheets they've glued in on pg. 63 and pg. 64 of their interactive notebooks. We will work on this as a class and it takes the place of their Cornell Notes.
This is where we begin to go into quantum numbers and electron configuration. Quantum numbers give us an "address" for a given electron. For our purposes, we do not go into too much detail with quantum numbers. We only focus on size and energy level, shape, and spin. For size/energy level, I show them that numbers are related to size. The higher the number, the bigger the circle. For 1s (Energy level 1, don't focus on the s yet. We will get to that) is smaller than 2s (Energy level 2).
 Now, we can explain the shape and I have them draw that on their worksheet. This is an image on what they'll be doing for that particular worksheet.
 Ultimately, we go into orbitals, how many electrons are in an orbital, and we tie everything to Bohr. At the bottom of the worksheet, you can see how we look at energy levels individually. When you add up the total number of orbitals and number of electrons per orbital type, you see the total number of electrons per principal energy level. It equals the number of electrons in each orbit in the Bohr diagram!
 It's so beautiful to hear the OHHHHHH!!!! come from their mouths. Although the Bohr diagram only accurately explains Hydrogen, Bohr did have the right idea on how the atom behaves. He just wasn't 100% there!
We move on to the electron configuration help sheet. This worksheet has the different rules that electrons follow. They don't position themselves randomly wherever they want. This worksheet will lead us into drawing the orbital diagrams.
 These rules are extremely important for many things we will be doing from here on out. I'm not really concerned on whether students memorize the names. I would rather focus on them knowing what the rules do. Add electrons one at a time starting at the lowest energy level, opposite spins in each orbital, and electrons want to be by themselves first, then they pair up. This will spill into Lewis dot structures and bonding in later units.
At this time, I give students a little break from this intensive lesson. I have them pick up two additional worksheets that they will glue on pg. 65 and 66 of their interactive notebook. These are titled Electron Configuration Arrows (pg.65) and Orbital Aufbau (pg. 66) diagram. Here is the resources link again if you need it.
Resources
Once we go through the background on how this theory came to be, students start filling in the worksheets they've glued in on pg. 63 and pg. 64 of their interactive notebooks. We will work on this as a class and it takes the place of their Cornell Notes.
This is where we begin to go into quantum numbers and electron configuration. Quantum numbers give us an "address" for a given electron. For our purposes, we do not go into too much detail with quantum numbers. We only focus on size and energy level, shape, and spin. For size/energy level, I show them that numbers are related to size. The higher the number, the bigger the circle. For 1s (Energy level 1, don't focus on the s yet. We will get to that) is smaller than 2s (Energy level 2).


We move on to the electron configuration help sheet. This worksheet has the different rules that electrons follow. They don't position themselves randomly wherever they want. This worksheet will lead us into drawing the orbital diagrams.

At this time, I give students a little break from this intensive lesson. I have them pick up two additional worksheets that they will glue on pg. 65 and 66 of their interactive notebook. These are titled Electron Configuration Arrows (pg.65) and Orbital Aufbau (pg. 66) diagram. Here is the resources link again if you need it.
Resources
After about five minutes, we continue to finish up for the day. We work on a couple examples first then allow the kids to work one for themselves. I start with Carbon. I noticed that my students really like when thing are done systematically. We start by writing down how many electrons the particular element we are talking about has. We then use arrows to denote electrons and fill in the boxes using the 3 different rules we've learned about. We start at the lowest energy level first (Aufbau principle) which is 1s. 1s only has 1 orbital. We draw one arrow up and one arrow down (Pauli exclusion principle). Then we can move on to 2s. One orbital again, so we draw one arrow up and one arrow down. However, when we get to 2p, p has 3 orbitals. We draw only two arrows up unpaired. This is because of Hund's rule. Electrons want to be by themselves before they pair up. In this image, the correct orbital diagram is the third one.
 We practice writing down the orbital diagrams flat (left to right) because they save room on paper. Electron configuration is also determined from here. This is where we introduce the arrow diagram. Students tend to struggle on what comes next. Especially when we start getting into the d orbitals. If students follow the arrows, they will know what to write next.
 So, 1s 2s 2p 3s 3p 4s 3d 4p 5s etc! I explain to students that the superscripts above the s,p,d,f orbitals represent number of electrons. We started learning that s orbitals can only have two electrons because they only have 1 orbital. The p can hold 6 electrons because it has 3 orbitals. So on and so forth. After completing these examples, with the last 10-12 minutes left in class, I ask them to work on two more examples on their pg. 66 worksheet.
This lesson is pretty intense. However, we seemed to have managed to get through it!
Until next time! Join me at the Nerdy Teacher's Corner!


This lesson is pretty intense. However, we seemed to have managed to get through it!
Until next time! Join me at the Nerdy Teacher's Corner!
No comments:
Post a Comment