Wednesday, February 28, 2018

Flame Test Lab

Tuesday January 16, 2018

Welcome back to the Nerdy Teacher's Corner!

Today, we have a really fun lab prepared for the kids! The Flame Test lab will tie in together the Bohr diagrams they've been working on, the Electromagnetic Spectrum, and Light and Matter. The step by step lab can be found on my resources page which I will link below. However, I'll be discussing some specific things about this lab in the following blog!

Before introducing the lab, my mentor teacher used his Chemistry 2 class to set up the lab. They created a 1 Molar solution of Lithium Chloride, Barium Chloride, Strontium Chloride, Calcium Chloride, Copper (II) Chloride, Sodium Chloride, Potassium Chloride, and Sodium Borax.They were also required to create MSDS sheets for each station so that students knew how to clean up any spills or what to do in case of emergency. 

I spent some time explaining to students what they were going to be doing in this lab. We left some wooden splints overnight in each of the solutions. Students would be using tongs to handle the splints and run them over the flame from a Bunsen burner. I explained to my students that when they handle the Bunsen burner, they needed to exercise caution. One of my students ended up getting burnt in my 4th period class because the flame had the oxygen portion (air hole) open all the way. The flame flickered onto her hand and ended up burning her. Thankfully, we were able to treat it immediately and she didn't end up with a blister. Below I have shown the parts of a Bunsen Burner for reference.
 There was an additional lab station in the classroom that is not on the Flame lab. We added Iron Powder. In that part of the lab, students would be using a pipette to gather some iron powder into the pipette. At a distance, students would push out the iron powder into the Bunsen Burner. They shouldn't be putting the pipette into the Bunsen Burner. I know this sounds silly, but some students did this and melted the plastic pipette. Here are some of the videos of the kids performing the Flame Test. They would record what colors they saw. As you can see, some of the colors are absolutely beautiful! 
In some of the videos, you'll notice that the students are dipping the wooden splints into a watch glass with some chemicals. I put out the solid chemical out for everything except Barium Nitrate.
 There were a total of 11 stations throughout this lab. The 11th station was something a little different. At this station, students would have discharge tubes filled with different gases in each tube. Students will be able to observe the different atomic spectra different elements give off by using a diffraction disk or a spectroscope. We specifically used the spectroscope show in the image on the right. We don't have access to the high tech spectroscope at the school. However, the one on the right works just as well.


There are a couple safety issues that must be discussed with this station. The discharge tube should be handled with care. Students may throw the discharge tube back into the box and break them. I told my students that they cannot leave the discharge tube with the power source turned on for longer than 30 seconds. The reason is, when they go to take out the discharge tube (which should be handled with gloves or a paper towel) it may be hotter than students expected. They may drop the discharge tube and break it. 
I have attached the pictures my students took of the atomic spectra. They were really smart and put the diffraction disk over their phone camera and got these images.
 It was really awesome! 


That's all I have for you today! Join me next time in
The Nerdy Teacher's Corner!

Thursday, February 15, 2018

Wave and Bohr Applications

January 11, 2018

Welcome back to the Nerdy Teacher's Corner lil' scientists!

Today we start our day with applications of what we learned so far. 
My students have received the Wave Calculation Problems that can be found on my resource page.
While my students have only seen their example problems, the Wave Calculation Problems will have similar problems to what they have already seen. To get their brains started, I have handed out a whiteboard to each table. 
On the Promethean, I have put a problem up for them to work out. Using their notebook where the examples problems are, they must work together to solve the problem on their whiteboards. During this time, I walked around the classroom to see what students are thinking and doing. I, personally like to do this because I can catch common misconceptions. Then I can reteach students in anything they are struggling in. Once they have completed the problem, we will go over it together on the Promethean and see what the correct answer is. When I demonstrate on the Promethean, I project how I plug in the numbers into the calculator as well. This will address a problem students encounter when getting into their answers. Once we have worked through this problem, I let the students work on the worksheet for roughly 30-45 minutes. I walk around the classroom and help them as they need. 
I do want to address some of the common issues students find when working out these problems. A lot of times my kids are sitting there like....
They just don't like math. They tend to freak out when they see large numbers. As I mentioned in my previous post, I do try to emphasize that all numbers need to be in parentheses. Check out the image below to see what I mean by parentheses. About 85% of the time, students will get the incorrect answer simply because they did not put those numbers in parentheses. 

About 5% of the time, they will accidentally multiply instead of divide. Another 5% of the time, they will forget to convert nanometer to meters. The final 5% of the time, they will simply forget units and add whatever unit they can remember without thinking about it. 
So, the four square we use helps a little bit with it. Now, there are students who do not need the four square. They are meticulous in their work and do not have the problems. And that's okay. For some students, the four square avoids the issues with getting the unit wrong. They just copy it over from the first square. It also helps with the nanometer to meter issue. If you are not sure what I'm talking about, refer back to my Light and Matter pt. 2 blog! Here's the link!
Light and Matter 2

Now, we continue to do some applications on the rest of the subjects we've covered. I have handed out today a worksheet for my students to do. This worksheet is made up of a back and front side and will be glued to their interactive notebook on page 62. The front is the area where students will draw the Bohr diagrams for elements 1-18. That's Hydrogen to Argon. Again, here is the link.
Resources
In their Nearpod lesson, students have gotten instructions to write on page 59 the steps on how to draw the Bohr diagram for any element. They will use this as a reference. The back page has some information relating to valence electrons, trends for different groups focused specifically on how to find the valence electrons using both the Bohr diagram and their periodic table, and patterns to look out for as they go down a group. My students are given the rest of the time to work on these Bohr diagrams. Here's what it looks like:

This is the only time they will have to work on this, so they must use their time wisely. In some cases, I tell students that I will collect the work at the end of the period depending on how hard they are working. Or, I will leave out that it will be part of their notebook grade. This has helped me numerous times in ensuring that students get their work done. When doing this, I always make it a point to make sure I walk around and help students. In some cases, I have to redirect other student's attention back to their work. However, walking around helps avoid distracted students for the majority of the time. :)

Well, that's all I have for you today!
Join me next time at the Nerdy Teacher's Corner!
We will start practical applications of this material!


Wednesday, February 7, 2018

The Famous Niels Bohr

January 9th, 2018

Welcome back to The Nerdy Teacher's Corner lil scientists! I am your awesome teacher, Ms. Llanes. Let's dive right in shall we? 

I started the day today with 30 minutes of working on our Wave Calculation worksheet. That can be found in my resources page. My mentor and I added on the four square so that students can actively use it. We are hoping that they will use them to make the math load a little easier. Not only that, but I'm hoping that using a graphic organizer will help them with reading word problems. My link is here below!
The students and I worked on the first half of the worksheet together. We simply worked on rearranging formulas so they are easier to use depending on what they're solving for. We, also practiced putting numbers into scientific notation. After that (which took roughly fifteen minutes with all the questions), I let students use another fifteen minutes to work on the actual word problems. I walked around the classroom and helped them if they asked for it. This only took up the first 30 minutes of class. My last hour of class was reserved for something fun!

Say hello to Niels Bohr! He will be the main topic of our discussion today!
For the last hour, I have dedicated to use a Nearpod lesson for Cornell Notes. I realize that my kids have been taking a lot of notes, but there is a lot of material to cover before we get to the fun stuff! Now, you may be asking, what's a Nearpod lesson? 
The Nearpod Lesson is actually a really awesome tool for teachers to use. My mentor currently has a paid subscription. I believe he said it's roughly $10 a month. There is a free subscription, however. It just doesn't have all the nifty features. Here's the website if you're interested.
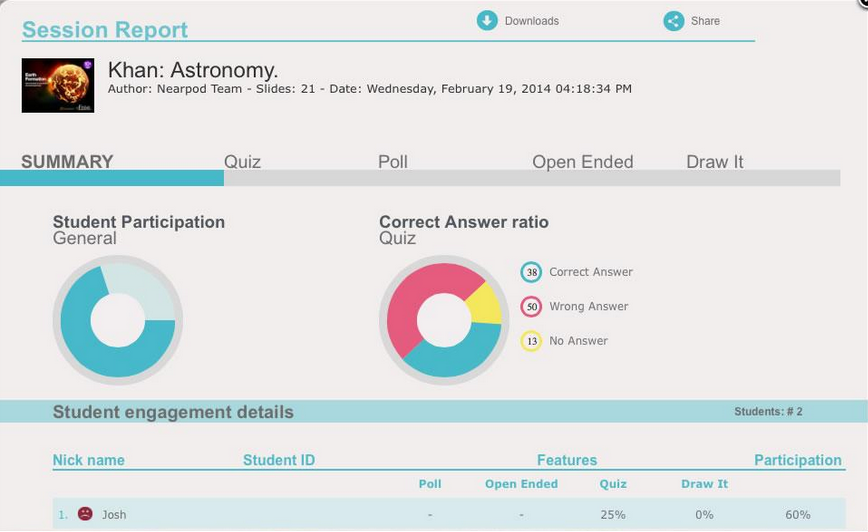
In the Nearpod lesson, you have the ability to upload your own PowerPoint presentation that students can take Cornell notes for. For the Bohr Nearpod, go to the website and type in Nearpod.com and scroll down to the bottom. You should see a section called For Students and room to type in a code. You can type in YDZNT and see what we specifically did for this lesson. One of the things that makes Nearpod such a success is that it is self-paced. Students decide when they want to move forward. If there's a particular area they are unsure or stuck on, they can ask for help or go back to the part of the lesson that they are stuck on. Another cool feature is that you can add activities for them to complete throughout the lesson to check their understanding. There are fill in the blanks, drawings, warmups, videos, entry/exit slips, and more. You choose what you want to add to it to make it more interactive. Finally, the Nearpod lesson provides data from the student work. 
As you can see, the data shows you what each individual (or group of students) answered. You can instantly see what they're struggling with. This allows you the opportunity to reteach anything. I set aside an hour for students to do this so that they have enough time. When I use Nearpod, it makes the lesson and my job really easy. I just walk around the classroom and answer any questions the students have. They still take notes Cornell style. These particular notes should be on page 59 and 60 of their interactive notebook. Page 59 should have instructions on how to draw a Bohr diagram. They also have a reference on how many electrons should be found in each energy level of the Bohr Diagram. 
This is all I have for today. Join me at The Nerdy Teacher's Corner next time to see what we have in store! 

Light and Matter pt. 2

January 8th, 2017

Welcome back to the Nerdy Teacher's Corner lil scientists!

Last time we left off, my students were learning about light behaving as a wave. Today is composed of periods 1-7 and an advisory period. This means that classes are roughly 30 minutes each. There's not a lot of time. However, it's the perfect amount of time to finish our Cornell Notes on Light and Matter. Today, we continue our lesson with light behaving as a particle. Students will take notes on page 58 of their interactive notebook. This starts at slide 23 on the Powerpoint I've added on my Resources page. You can click the link below.
Again, this is my mentor's work Ismael Renteria.
I introduce the subject just a bit and use the following video to elaborate. Quanta is an interesting word for students. I really like YouTube because it's a great tool for students to review information. 
I really like this video because it explains quanta in a way that students can relate to. Cookies! Not only does it relate it to cookies, but I like the way the chunks of energy are labeled by color dependent on high/low energy and high/low frequency. While labeling the electromagnetic spectrum, students have seen that the color purple gives off more energy compared to red. In the video, you see large packets of energy as Violet, Indigo, Blue. Small packets of energy are usually Red, Yellow, Green. This emphasizes energy, frequency, and wavelength with color. 
We continue further into the Photoelectric Effect which confirms Planck's Quantum Theory. Again, I show the kids the following video. This way they have a different voice providing the same information. 
This video also emphasizes large chunks with high energy waves. 

On the Powerpoint, there's a slide that introduces how the speed of light equation goes into Planck's equation. I do show the kids how to do this, however, often times it can we overwhelming. So, we take it step by step. The kids turn to page 57 in their interactive notebook and they will have two good problems to reference back on. The first problem, as you can see from the image below, asks them to use the new equation they have been introduced to. 
I have the students write out the problem first. Once they do, I ask them to circle what we are solving for. On my notes, you can see it's highlighted. We write that on the first part of the four square. They have to write the unit as well. As we move down the four square, this will be an important step. We then underline what we know. Or information that is given in the problem. When students write it, they have to write the symbol for that item. For example, frequency is v, h is Planck's constant, E is energy, c is the speed of light, and lambda is wavelength. This way they remember the symbols when plugging into the equations. Next, we look at what equations they need to use. We rearrange them so that they are just directly plugging in numbers. Finally, we plug in numbers into the last square instead of symbols. They plug into the calculator and then get their answer. Now, if they are unsure what unit to use, they simply look back at box 1. 
Now, the second problem has a little bit more problem solving. We combine using the speed of light equation with Planck's equation. We take it step by step just like the first one. When doing these problems, I just ask the students to follow along. I do emphasize that they plug in the number into the calculator in parentheses to avoid mistakes.

That's all we have today! Tune in next time to The Nerdy Teacher's Corner!